

South Indian Lunch Box Rice Recipes (Variety Rice Ideas)
Variety rice has been my quiet lifesaver for years — one pot, a handful of pantry staples, and something that tastes just as good (sometimes better) by the time lunch rolls around. This is a running collection of my favourite lunch-box-friendly rice recipes: the ones I make on repeat, pack without a second thought, and never get tired of.
I'll be adding to this list as I share more recipes, so bookmark this page — think of it as your growing lunch box rice rotation. Each recipe comes straight from my own kitchen, along with my notes on what stores well, what to eat fresh, and how to keep everything tasting good by the time the box gets opened.
Here's what's in the collection so far:
Best root rice
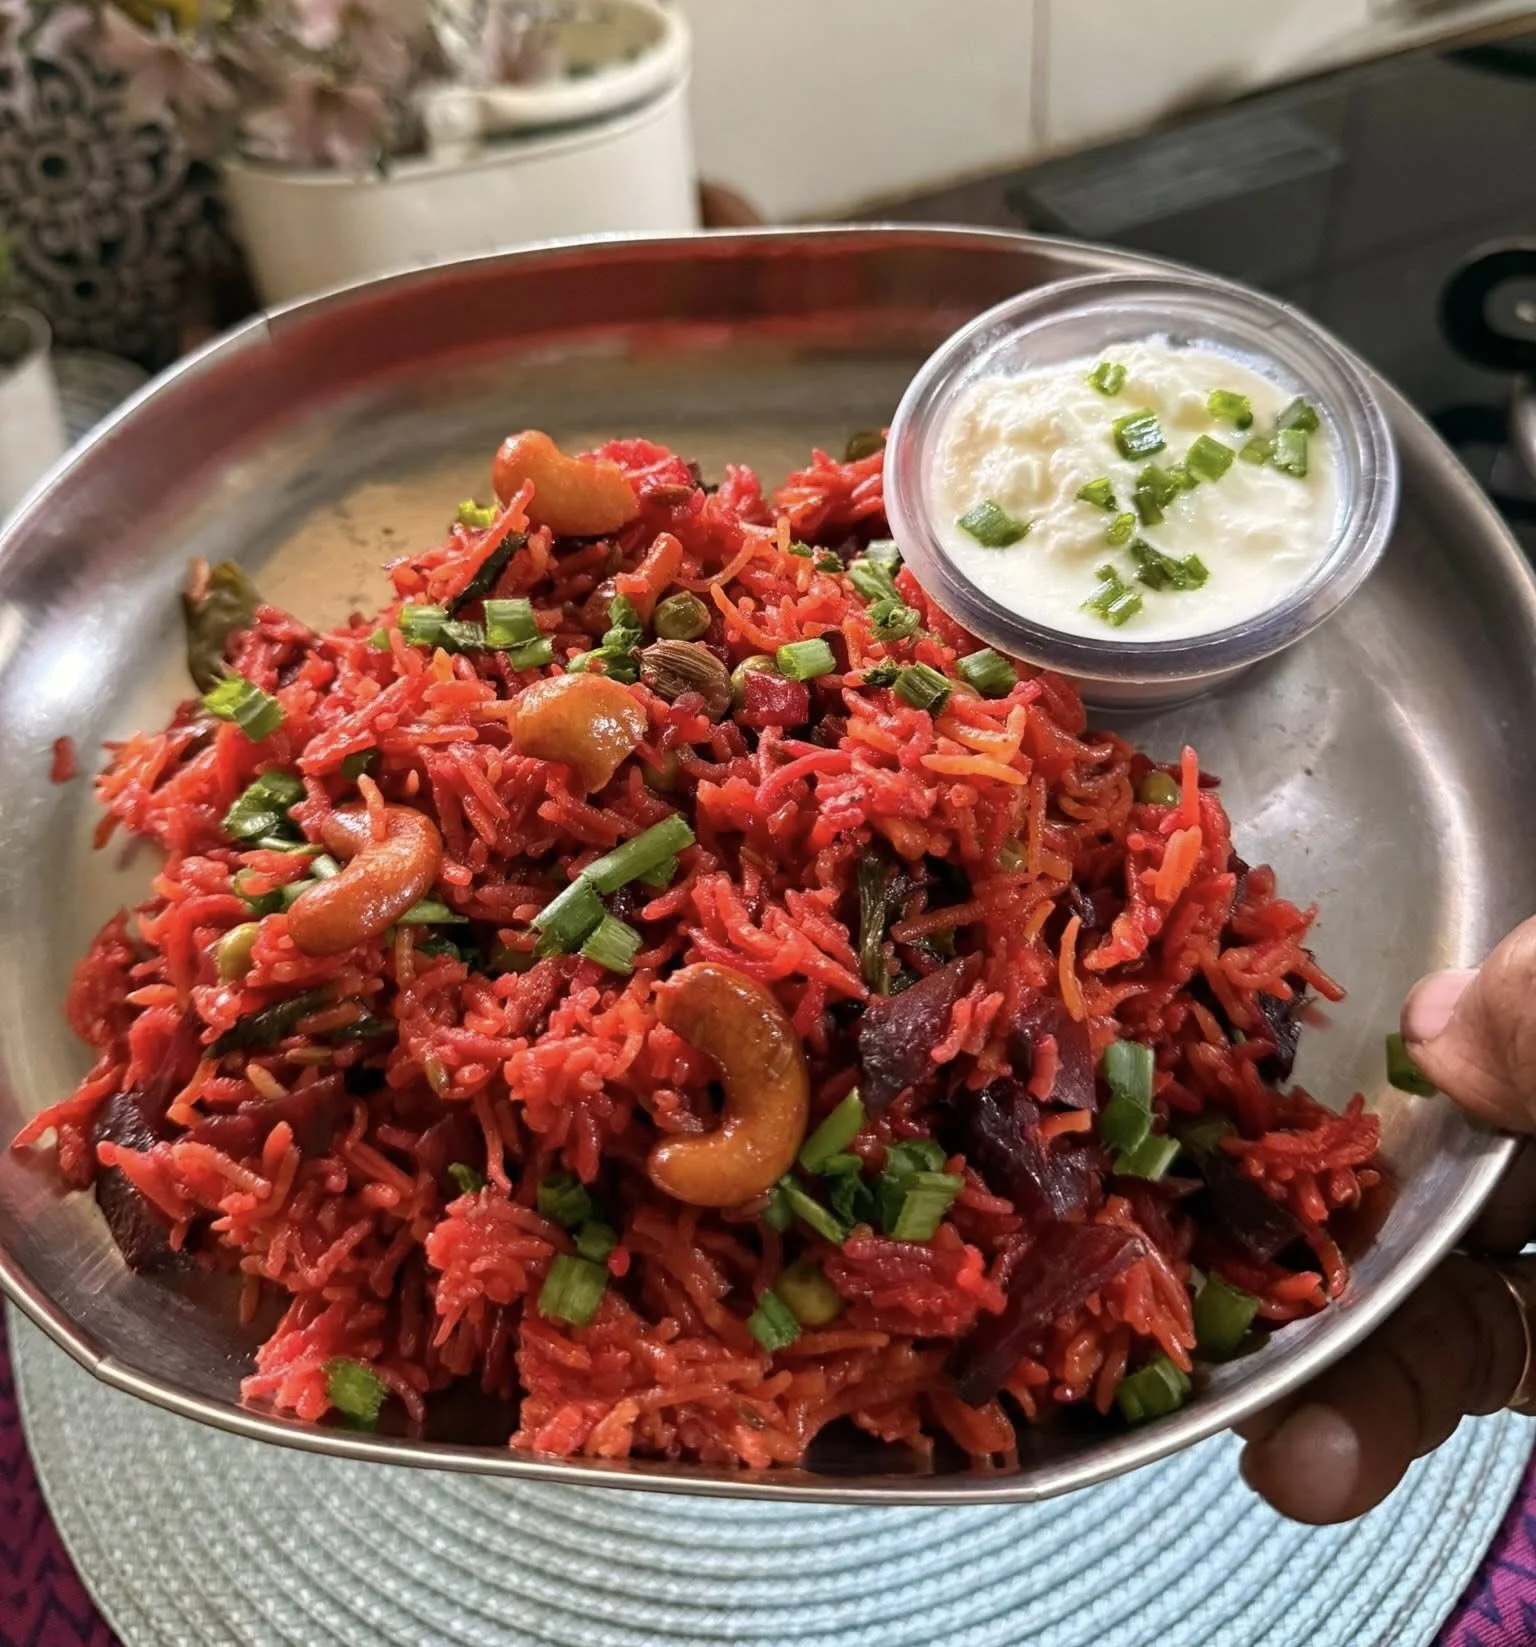
A vibrant, naturally sweet pulao that colors the whole pot — perfect for adding some cheer to a lunch box. Whole spices, garlic, and a beetroot that's sautéed just enough to release its color make this one as pretty as it is comforting.
Ingredients
• 1 cup basmati rice, washed and soaked for 20 minutes
• ¾ cup beetroot, finely chopped
• 1 onion, thinly sliced
• 1 tomato, finely chopped
• 3 garlic cloves, sliced
• 2 green chilies, slit (optional, for mild spice)
• 1 tbsp ghee (or oil)
• Salt to taste
• 1½ cups boiling water
Whole Spices
• 1 small piece star anise
• 2 cloves
• 1 green cardamom
• 1 small bay leaf
• ½ tsp cumin seeds
• ½ tsp garam masala
Method
1. Soak and prep: Wash and soak the basmati rice for 20 minutes. Drain and keep aside. Chop the beetroot, onion, tomato, and garlic.
2. Temper the spices: Heat ghee in a pressure cooker. Add cumin seeds, star anise, bay leaf, cardamom, and cloves. Let them sizzle until aromatic.
3. Sauté the base: Add the sliced onions and garlic, sauté until translucent. Then add the green chilies and chopped tomatoes. Cook till the tomatoes soften slightly.
4. Add beetroot: Stir in the chopped beetroot and sauté for 2–3 minutes till it releases its color and the raw smell reduces.
5. Season and mix: Add salt and garam masala. Mix well.
6. Add rice and water: Add the soaked rice and pour in 1½ cups of boiling water. Mix gently to combine.
7. Pressure cook: Close the lid and cook for 2 whistles on medium heat. Allow the pressure to release naturally.
8. Fluff and serve: Gently fluff with a fork. Serve hot with cucumber raita, plain curd, or papad.
Serving Suggestion: Best with chilled curd, boondi raita, or a simple appalam — a colorful addition to any lunch box.
Storage: Keeps well refrigerated for 2 days, and freezes for up to a month — a great one to batch-cook ahead.
Menthya Rice Bhath
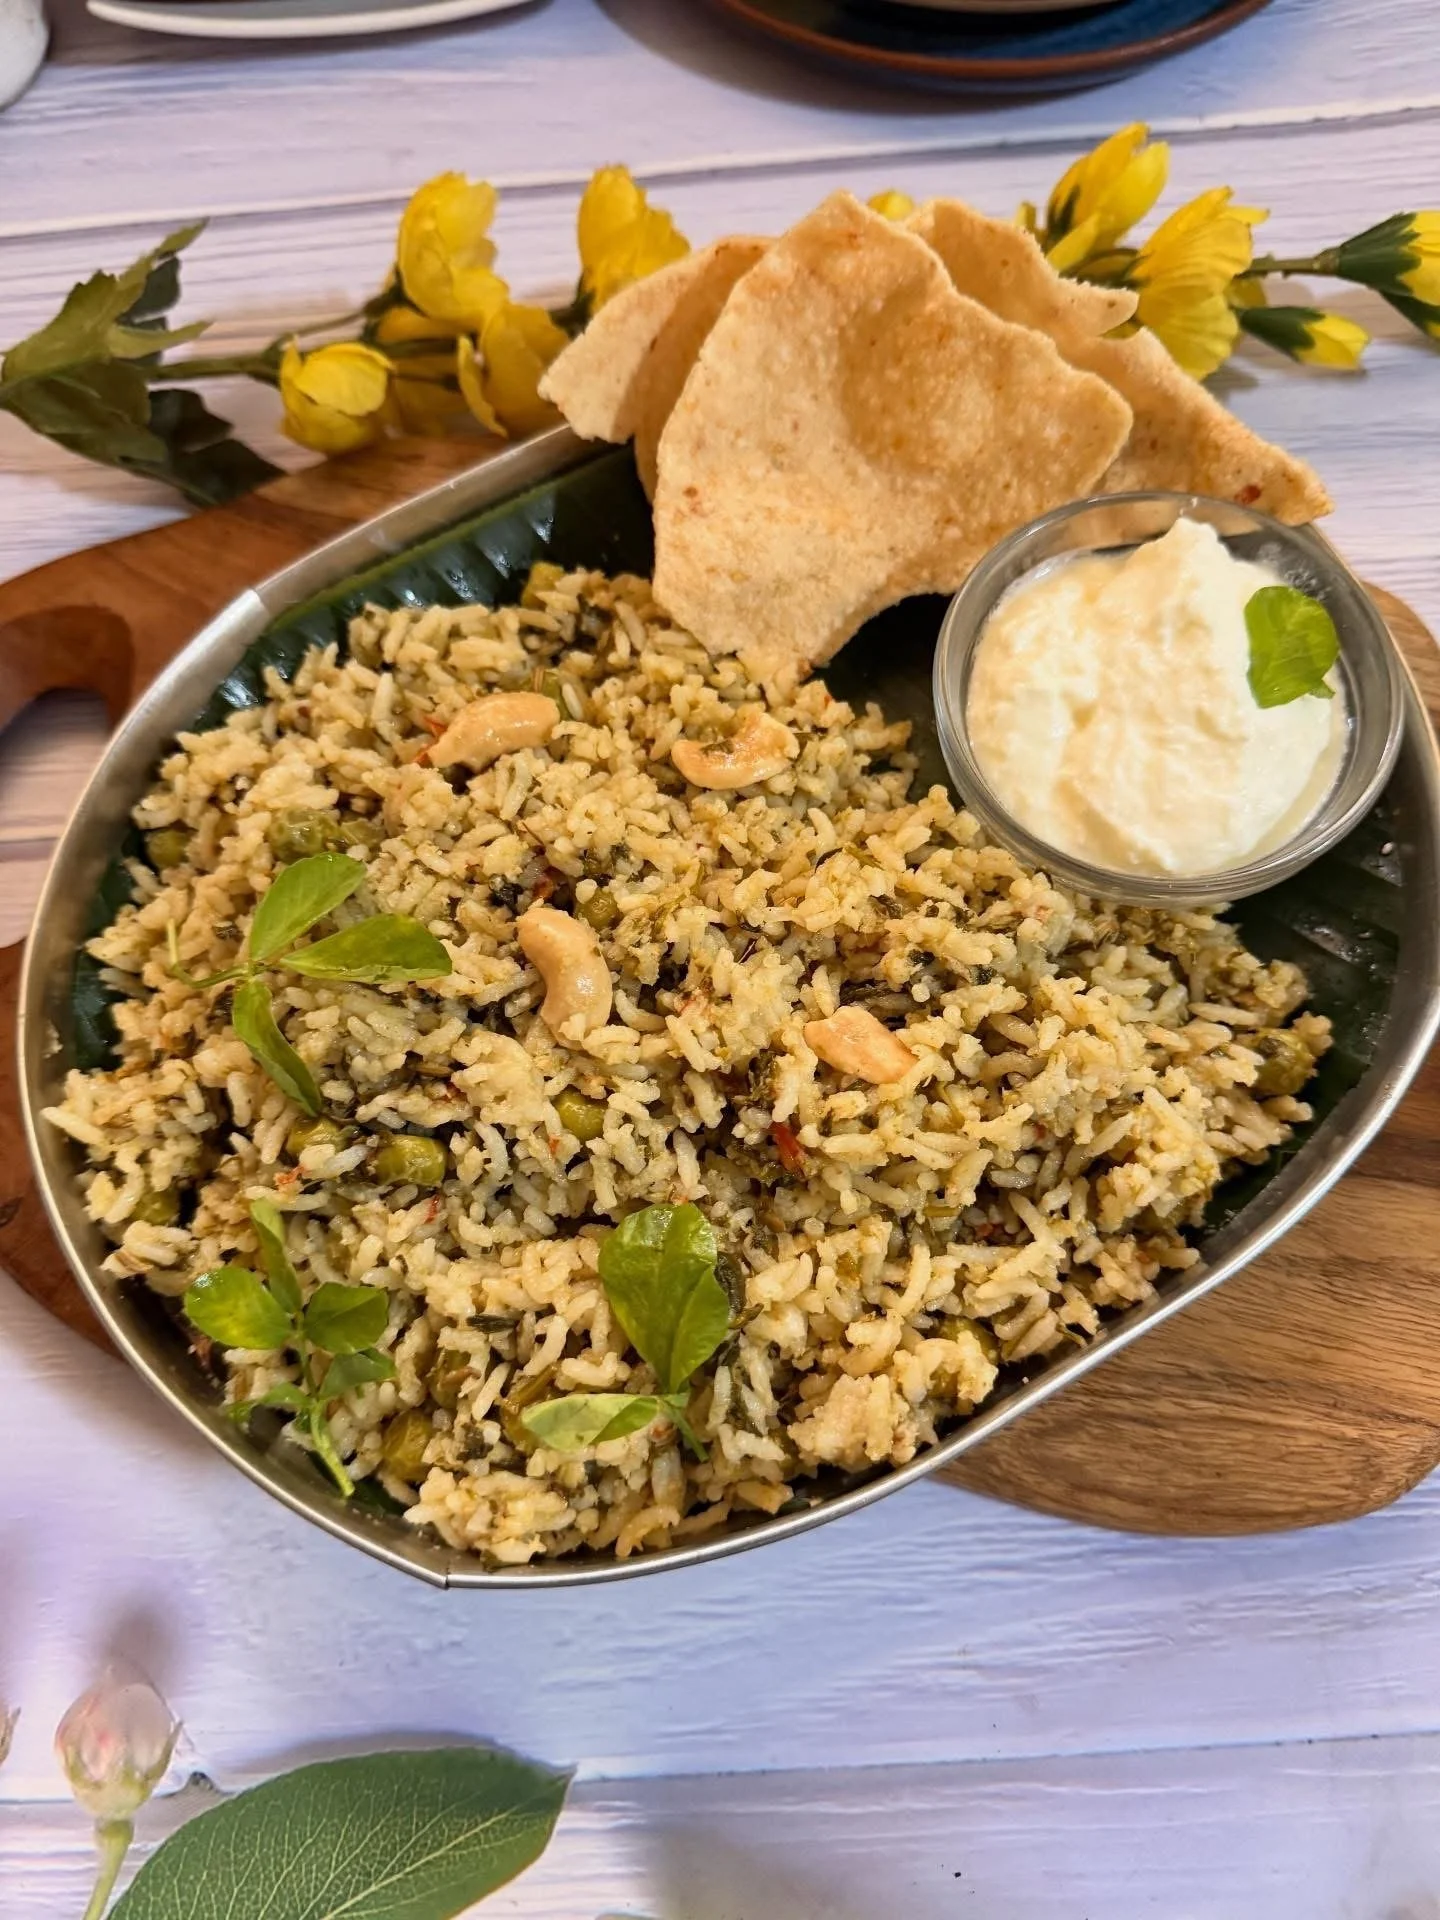
For the rice
• 1 cup rice, washed and soaked for 15–20 minutes
• 2 cups water (use less if using Basmati rice)
• 1 bunch fenugreek leaves, washed and roughly chopped
• 1 tomato, chopped
• ¼ cup green peas
• 2–3 green chillies (adjust to taste)
• A handful of mint leaves
• 2 tbsp oil or ghee
• A few coriander leaves
• ½ cup grated coconut
• 1 tbsp ghee
• 1 tbsp lemon juice (optional)
• 1 tbsp curd
• Salt to taste
• A few cashew nuts
Whole spices for sautéing
• 1 star anise
• 2–3 cloves
• 2 green cardamom
• Small piece of cinnamon
• 1 tsp fennel seeds
• 2 small bay leaves
• 1 tsp cumin seeds
• 1 black cardamom
Method
1. Grind 2–3 green chillies, coconut, mint, and coriander leaves into a paste. Keep aside.
2. Heat oil or ghee in a pressure cooker. Add all the whole spices — star anise, cloves, cardamom, cinnamon, fennel seeds, bay leaves, cumin seeds, and black cardamom. Sauté until fragrant, then add the cashew nuts.
3. Add the chopped tomato and sauté until slightly soft. Stir in the curd, then add the chopped fenugreek leaves and green peas. Sauté for 2–3 minutes until the raw smell reduces.
4. Add the ground paste and mix well, continuing to sauté for a minute.
5. Add the washed, drained rice and mix gently so the spices coat every grain. Pour in 2 cups of water, adjust salt, and add 1 tbsp ghee. Mix well and allow to come to a boil before closing the lid. Cook for 2 whistles on medium heat.
6. Let the pressure release naturally. Open the cooker, drizzle the remaining 1 tbsp ghee on top, fluff gently, and finish with lemon juice (optional) and fresh coriander leaves.
7. Serve with coconut chutney or raita.
Storage: Best enjoyed fresh, within 24 hours — the fenugreek leaves lose their character quickly. Not recommended for freezing.
Thakkali Sadham (Tomato Rice)

Other ingredients
• 1 tsp Kashmiri chilli powder
• 2 tbsp chopped spring onion greens (green parts only)
• ¼ cup cooked green peas
• 1½ cups Basmati rice (or any plain long grain)
• ½ tsp garam masala (I use Everest Kitchen King masala)
• Salt to taste
• 2 tbsp oil
For tempering
• ½ tsp mustard seeds
• ½ tsp urad dal
• ½ tsp chana dal
• 1 long red chilli
• Pinch of asafoetida
• Pinch of turmeric powder
• Roasted cashews or peanuts, optional
For garnish
• Sprigs of curry leaves
• Finely chopped spring onion greens
Method
1. Cook the Basmati rice with just enough water — 1½ cups rice needs about 2 cups water, since you want separate long grains, not mushy rice. Once cooked, spread out to cool, then fluff with a fork.
2. Puree the tomatoes, garlic, and onion together and set aside.
3. Heat 2 tbsp oil in a pan. Splutter the mustard seeds, then add urad dal, chana dal, dry red chilli, and curry leaf sprigs.
4. Add the cooked green peas, then the tomato puree, Kashmiri chilli powder, turmeric, asafoetida, garam masala, and salt. Stir well and let the paste cook down for a few minutes until thickened and fragrant.
5. Once the paste turns smooth and glistening, add the cooled rice — or set some paste aside and use only what you need right away.
6. Toss gently so every grain is coated. Cover and cook on low for a few minutes so the flavours absorb fully.
7. Garnish with spring onion greens (and cashews or peanuts, if using). Serve hot with papad or chilled cucumber raita.
Notes
• Finely minced onions can be added to the tempering, sautéed till translucent, before the tomato paste goes in — I've left it out of my version.
• Tetra-pak tomato puree works well in place of fresh tomatoes and gives a great colour too — just skip the pureeing step and add it straight after tempering, along with the garlic-onion paste.
• Spring onion greens are just my finishing touch — style the garnish however you like.
• Any good garam masala works; I keep Kitchen King sabzi masala on hand for a few different dishes.
Storage: Keeps well refrigerated for 2 days, and freezes beautifully for up to a month — a good one to double up and freeze in portions.
Temple Style Puliyogare (Melukote Style)
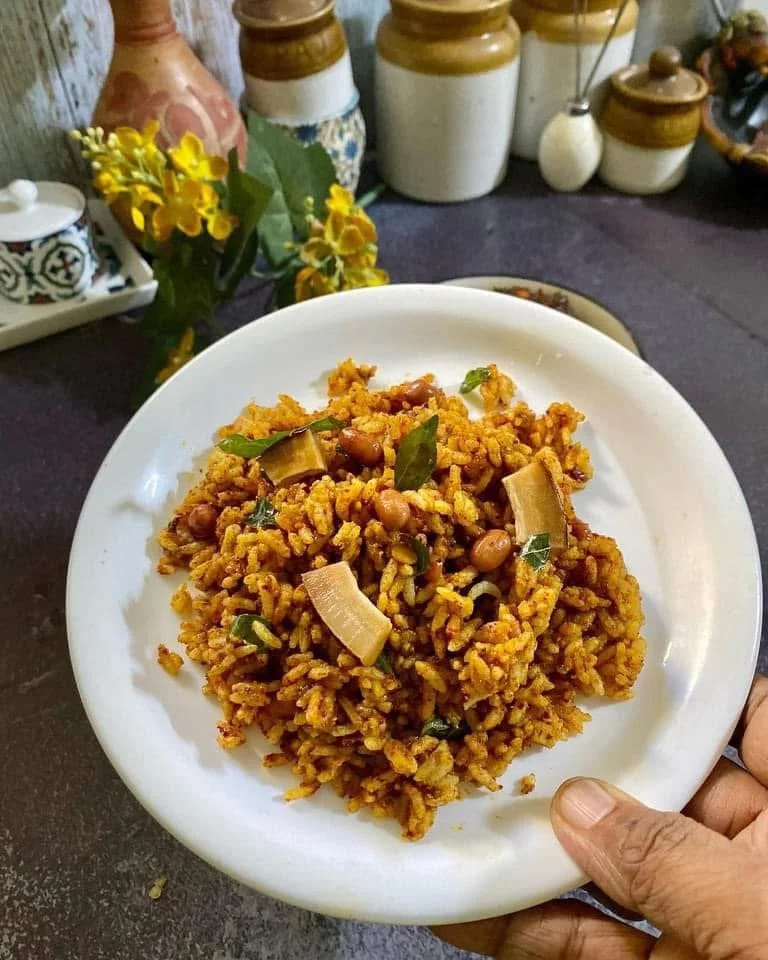
Tamarind Extract
• 1 sweet lime–sized ball of tamarind (about 125g), soaked in warm water and pulp extracted (use dark tamarind for best color and depth) — tamarind paste works too, for a quicker method
• ¼ cup jaggery (Melukote style uses a bit more — adjust to taste)
For the Spice Powder
• 2 tbsp urad dal
• 2 tbsp fried gram (pottukadalai)
• 2 tbsp chana dal
• 1½ tbsp coriander seeds
• 8 Byadagi red chilies (add a few spicier ones for extra heat, if desired)
• ¼ tsp methi (fenugreek) seeds
• 1 tbsp cumin seeds
• 1 tsp black peppercorns
• 1 tbsp black sesame seeds
Other Ingredients
• ½ cup sesame oil (nallennai)
• ½ handful curry leaves
• 1 tsp solid asafoetida (hing), or ½ tsp powdered
• 1 tsp turmeric powder
• Salt to taste
For Tempering
• 1 tbsp mustard seeds
• 1 tbsp chana dal
• 1 tsp urad dal
• A few curry leaves
• 5 tbsp peanuts
• A few thin slices of dry coconut (kopra) — optional
• A few cashew nuts — optional
Method
Step 1 — Prepare the Tamarind Base
Boil the tamarind extract with jaggery and turmeric powder until it thickens slightly and loses the raw smell. Add 2 tbsp sesame oil while it boils — this helps preserve the gojju longer.
Step 2 — Prepare the Spice Mix
Dry roast each spice powder ingredient separately until golden and aromatic. Oil-fry the red chilies till crisp, and roast the black sesame seeds till they start popping. If using solid asafoetida, fry it in a little oil until puffed and crisp. Cool everything and grind to a fine powder. Mix in the turmeric and keep aside.
Step 3 — Cook the Gojju (Puliyogare Paste)
Once the tamarind-jaggery mixture is thick and glossy, add 2–3 heaped tbsp of the ground spice mix (adjust to taste). Stir well, add salt, and drizzle in about 3 tbsp sesame oil. Cook on low flame until the mixture thickens into a smooth, glossy, spreadable paste — it shouldn't be watery.
Step 4 — Prepare the Tempering
Heat sesame oil in a separate pan. Splutter mustard seeds, then add chana dal, urad dal, and peanuts. Fry till golden. Add cashews and kopra slices (if using) and fry till crisp. Finish with curry leaves and switch off.
Step 5 — Mix the Puliyogare
Take warm, cooked rice and fluff gently. Add a spoonful or two of the gojju and mix gently by hand — this coats the rice evenly without breaking the grains. Pour the tempering over and mix again.
Serving Suggestion: Serve with papad, curd, or a small cup of fried boondi for the perfect temple-style combination.
Notes & Tips for Perfect Melukote Puliyogare
1. Tamarind choice matters — dark, aged tamarind gives that rich temple-style color and depth; lighter tamarind is milder.
2. Balance the flavors — tangy, sweet, and spicy should sit in harmony. Adjust jaggery and spice to taste, but let tamarind stay the hero.
3. Spice powder freshness — always roast and grind fresh for the best flavor. Store any extra in an airtight jar.
4. Sesame oil is essential — don't substitute; it's key to the authentic flavor and to shelf life.
5. Rice texture — use slightly cooled, firm rice, not mushy. Spread it out before mixing, and mix by hand for the best texture.
6. Variation — a few pieces of dry coconut (kopra) or a pinch of powdered jaggery at the end adds extra sheen and sweetness.
7. For prasadam-style aroma — a tiny piece of fried hing added while boiling the tamarind mixture brings that unmistakable temple fragrance.
Storage: The gojju itself keeps 10–15 days refrigerated, and up to a month if made with enough oil and no moisture — it's the most travel-friendly part of this dish. For best texture, store the gojju and tempering separately and mix with warm rice only when ready to serve, especially if packing for travel or gifting.
One Pot Rasam Sadham
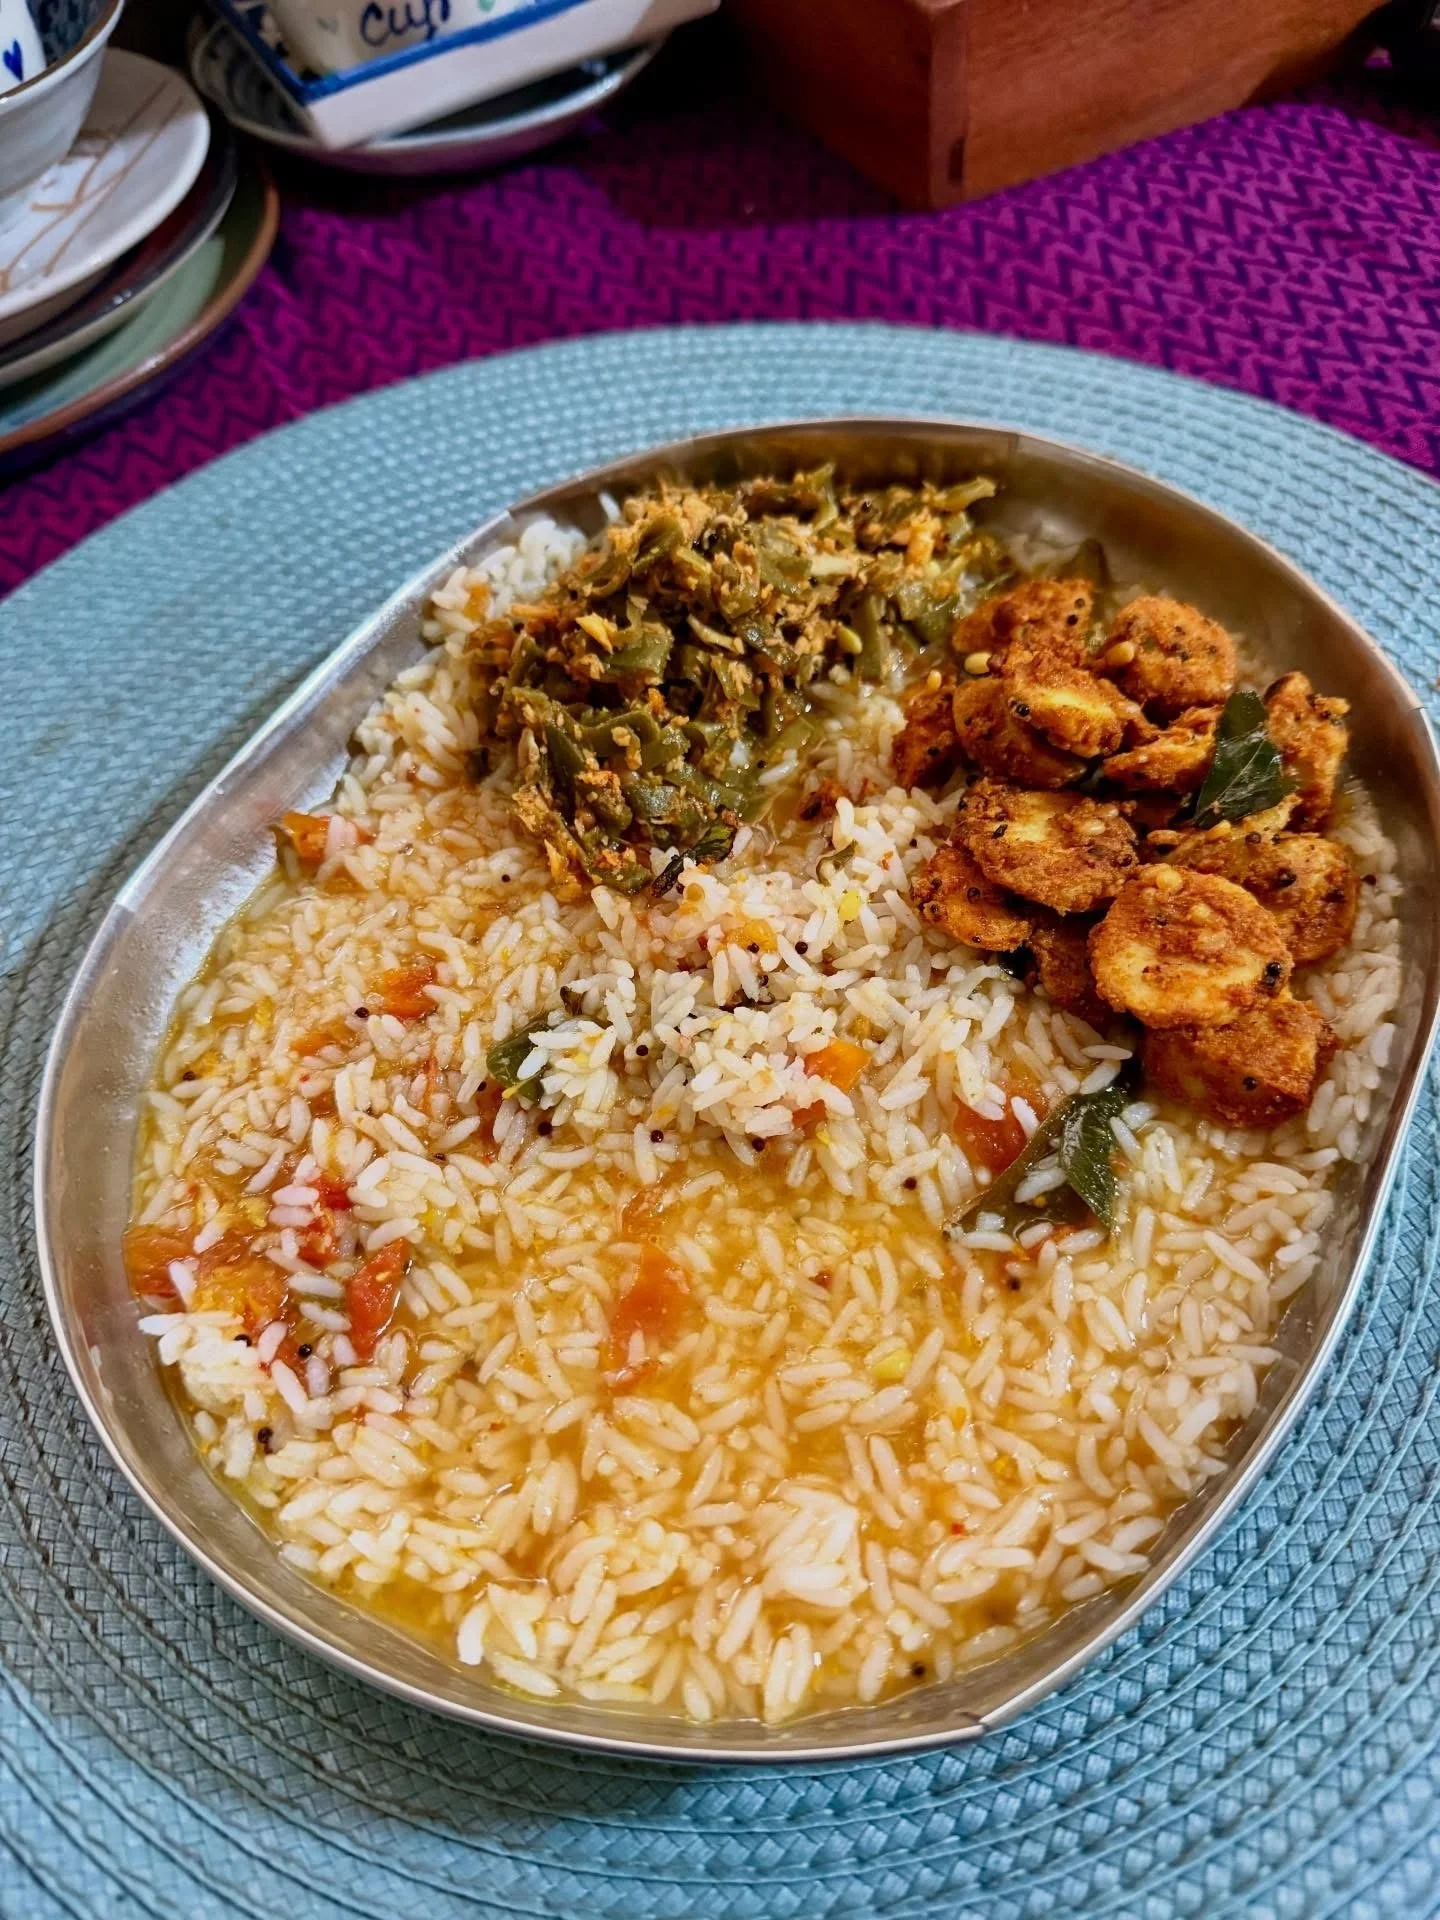
One Pot Rasam Sadham is the ultimate comfort food — tangy, mildly spiced, and ready in minutes. A bowl of warm rasam rice can soothe you like nothing else after a long day. Traditionally, rasam and rice are cooked separately and then mixed, but this one-pot method brings the same comforting flavor with half the effort — ideal for beginners, students, or anyone looking for a quick, homely meal.
Ingredients (Serves 2–3)
• ½ cup raw rice (short-grain or sona masoori)
• 1 medium tomato, chopped
• ½ tsp tamarind paste (or a small marble-sized ball of soaked tamarind)
• 2 cups water (adjust as needed for consistency)
• 1 tsp rasam powder
• ¼ tsp turmeric powder
• ½ tsp mustard seeds
• ½ tsp cumin seeds
• 2–3 garlic cloves, crushed
• 1–2 dried red chilies
• A pinch of asafoetida
• A few curry leaves
• Salt to taste
• 1 tsp ghee or oil
• Fresh coriander leaves, for garnish
Method
1. Rinse the rice well and keep aside.
2. In a pressure cooker or Instant Pot, heat the ghee or oil.
3. Add mustard seeds, cumin, garlic, red chilies, curry leaves, and asafoetida. Let them splutter.
4. Add the chopped tomatoes, turmeric, and rasam powder. Sauté till the tomatoes soften.
5. Add the tamarind paste, salt, and 2 cups of water. Stir well.
6. Add the rinsed rice, mix, and cook for 6–7 whistles (or 8–9 minutes in an Instant Pot on pressure cook mode).
7. Once the pressure releases, mash gently, and stir in a little hot water to loosen it to a slightly runny consistency, if you like it soft.
8. Garnish with fresh coriander leaves and a drizzle of ghee before serving.
9. Serve hot with papad, pickle, or a simple vegetable stir-fry on the side.
Storage: Best eaten fresh, within a day — if packing for lunch, keep any sides (poriyal, papad) separate so the rice doesn't turn soggy by lunchtime.
How to Store & Pack These for Lunch Box
General rule: Let the rice cool completely to room temperature before packing or refrigerating — sealing it in hot means trapped steam, which turns rice soggy and cuts down how long it stays fresh.
Fridge & freezer life:
Dish Fridge Freezer
Beetroot Rice 2 days Yes, up to 1 month
Menthiya Rice 1 day (best fresh — leafy greens turn faster) Not recommended
Tomato Rice 2 days Yes, up to 1 month
Puliyogare 3 days (tamarind acts as a natural preservative) Yes, up to 1 month
Rasam Sadham 1 day, rice and rasam best stored separately Not recommended (rasam separates on thawing)
Reheating: Sprinkle a teaspoon of water over the rice before microwaving, covered, for 60–90 seconds — this brings back the moisture that fridge storage pulls out. Stovetop works the same way with a splash of water on low heat.
Packing tips:
• Puliyogare is the safest bet for outstation travel or a hot afternoon lunch box — no dairy, and it holds up for hours without refrigeration, which is exactly why it's the temple-tiffin classic.
• For Rasam Sadham, pack the rasam-soaked rice and the sides (poriyal, paneer) in separate compartments — combined, the rice turns mushy by lunchtime.
• Menthiya Rice is the one to make fresh that morning rather than the night before — the greens lose their bite quickly.
• Skip the curd side if the lunch box won't be refrigerated; pack it separately in a small container instead.